灯带物料表:
https://docs.geeksman.com/esp32/
ws 2812 灯带 一条。 Nano V3 Atmega328P 一块
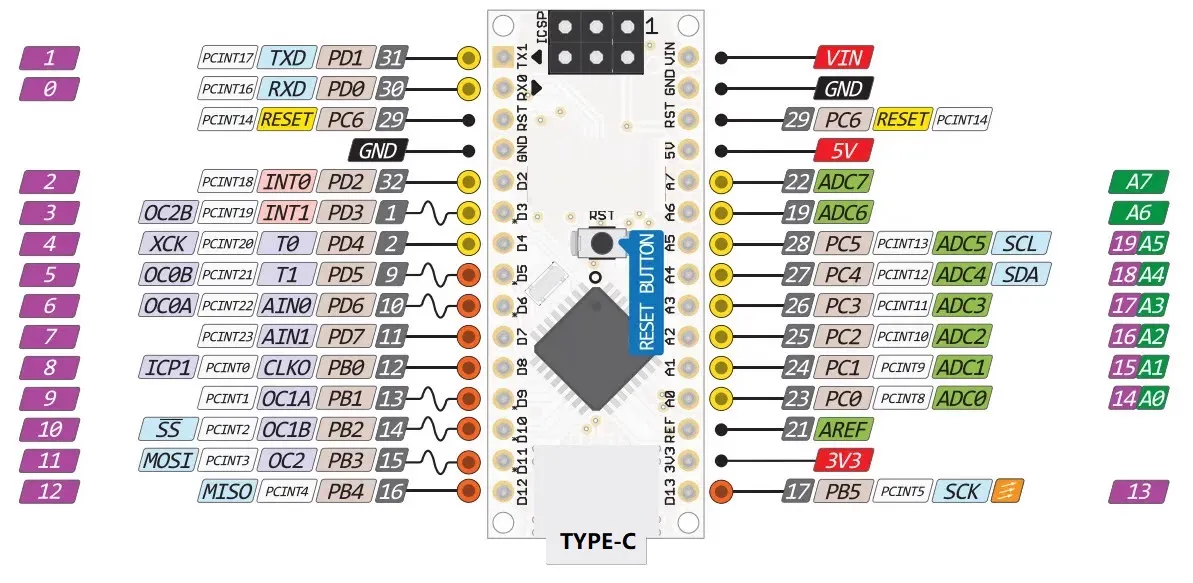 4按键板一块
供电模组:
18650
软包锂电池
usb 5V供电(暂定)
4按键板一块
供电模组:
18650
软包锂电池
usb 5V供电(暂定)
一块 Oled 单色屏(用于显示UI)SSD1306 驱动
代码:
参考地址:
https://blog.csdn.net/qq_55493007/article/details/125374751 `https://doc.itprojects.cn/0006.zhishi.esp32/02.doc/index.html
参考代码:
import neopixelfrom machine import Pinimport timeimport urandom
GBIO_IN = Pin(15)  # 控制信号输入引脚LED_NUM = 30  # LED灯的数量
# class NeoPixel(pin, n, bpp=3, timing=0)#    pin :输出引脚,可使用引脚见下文#    n :LED灯的个数#    bpp:#        3:默认为3元组RGB#        4:对于具有3种以上颜色的LED,例如RGBW像素或RGBY像素,采用4元组RGBY或RGBY像素#    timing:默认等于0,为400KHz速率;等于1,为800KHz速率#
LED = neopixel.NeoPixel(pin=GBIO_IN, n=LED_NUM, timing=1)  # 创建控制对象
LED.fill((255, 0, 0))  # GRB填充数据(RGB顺序, 0为不亮,255为全亮)LED.write()  # 写入数据time.sleep(1)
while True:    r = urandom.randint(0, 255)    g = urandom.randint(0, 255)    b = urandom.randint(0, 255)    for i in range(30):        LED[i] = (r, g, b)  # 依次设置LED灯珠的颜色        LED.write()  # 写入数据        time.sleep_ms(50)
    r = urandom.randint(0, 255)    g = urandom.randint(0, 255)    b = urandom.randint(0, 255)    for i in range(29, -1, -1):        LED[i] = (r, g, b)  # 依次设置LED灯珠的颜色        LED.write()  # 写入数据        time.sleep_ms(50)
项目需求可变量:
灯带长度(代码中配置) 循环长度(代码中配置) 速度 : float[] 可调节 // ms 亮度: float[] 可调节 // 0 ~ 1 模式:text[] 可轮流切换
根据 current_mode 来进行队列生成方法的选择
处理时考虑 灯带长度,循环长度,亮度 生成色表 通过色表来进行硬件渲染 速度决定更新时长间隔
ui如何处理?
按键功能如何分配?
暂定4 按键?
按键需要实现功能:
有UI: 开机(确定), +, -, 返回 // 改为三个按钮: 取消返回键,确定和返回共用按钮 开机 主界面: 模式 常亮(单色) 呼吸灯(单色 / 渐变) 跑马灯(没有颜色选项) 渐变(没有颜色选项) 闪烁(受到颜色影响,可随机,可渐变) 随机颜色(不受颜色影响) 缓亮(固定颜色) 亮度(灯光亮度)[0到255] 32,127,255 速度(灯光速度) 单位毫秒,更新一次的时间 uint speedList[] = { 20, 50, 100 }; 切换随机 切换渐变
// 返回 HSV 颜色 (待定)int rgb_to_hsv(int r,int g,int b){ double min, max, delta; min = std::min(std::min(r, g), b); max = std::max(std::max(r, g), b); v = max / 255.0; delta = max - min; if (max != 0) { s = delta / max; } else { s = 0; h = -1; return; } // max 为红色 if (r == max) { h = (g - b) / delta; } else if (g == max) { h = 2 + (b - r) / delta; } else { h = 4 + (r - g) / delta; } return h,s,v}屏幕操作参考:
https://www.bilibili.com/video/BV1RM4y1a7J5?p=18
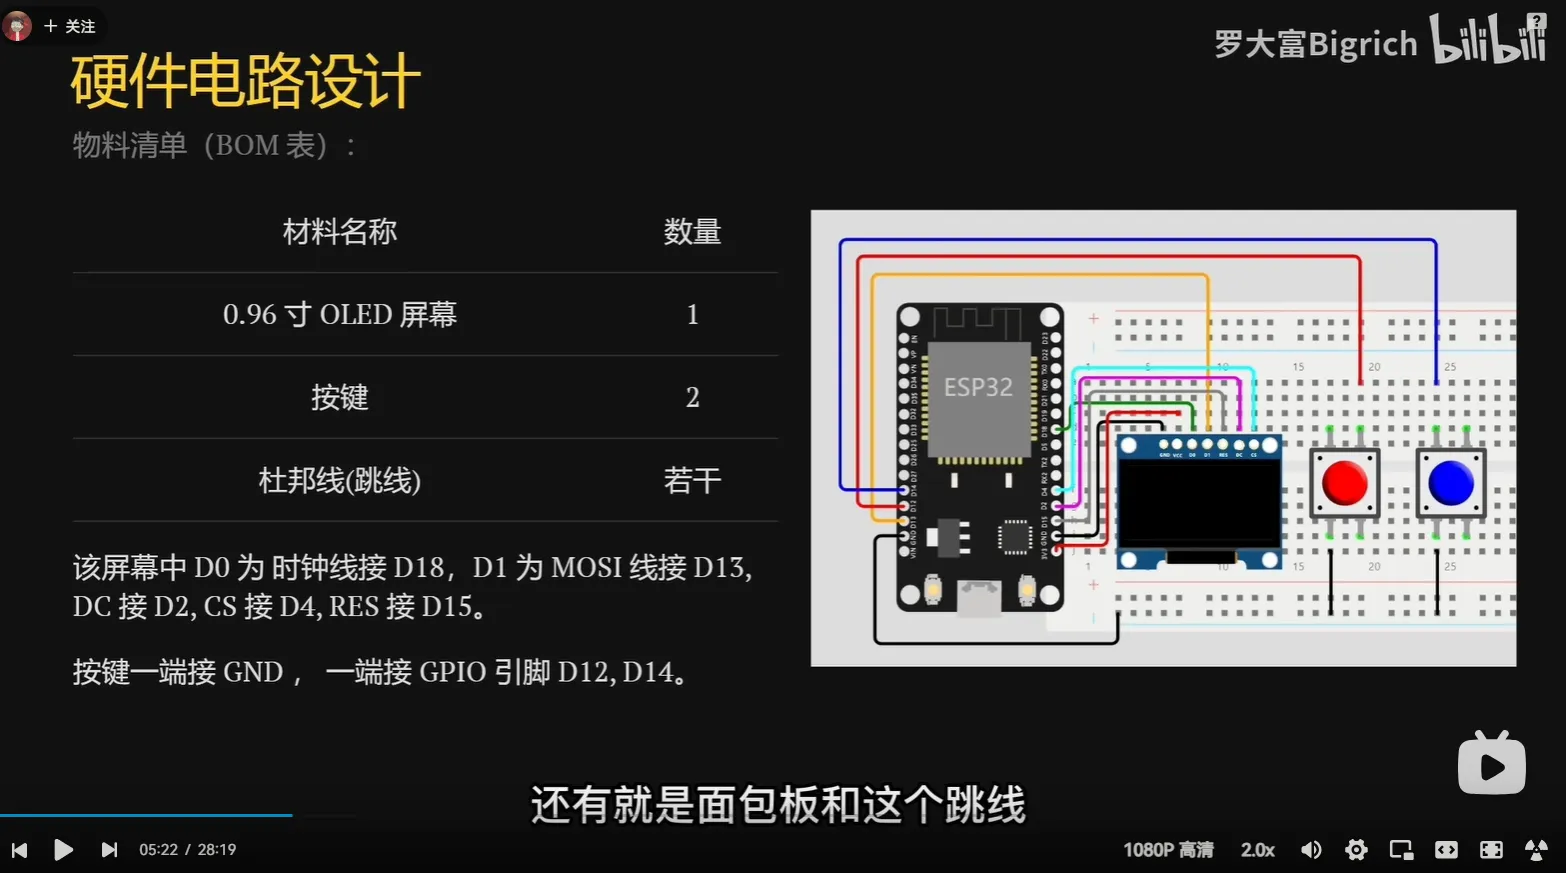
按键板:
| K1 | A4 |
|---|---|
| K2 | A5 |
| K3 | A6 |
| K4 | A7 |
| GND | GND |
新版按键:
| K1 | D5 | 5 |
|---|---|---|
| K2 | D4 | 4 |
| K3 | D3 | 3 |
| K4 | D2 | 2 |
| GND | GND |
OLED 屏幕 # 0.91寸OLED模块12832液晶屏ssd1306显示屏 IIC模块 4针oled屏
| GND | GND | ||
|---|---|---|---|
| VCC | VIN/3V3 | ||
| SCK | D13 | 17 | // 链接到 SCL(A5) 上 成功点亮 |
| SDA | A4 | 27 |
大号屏幕链接图:
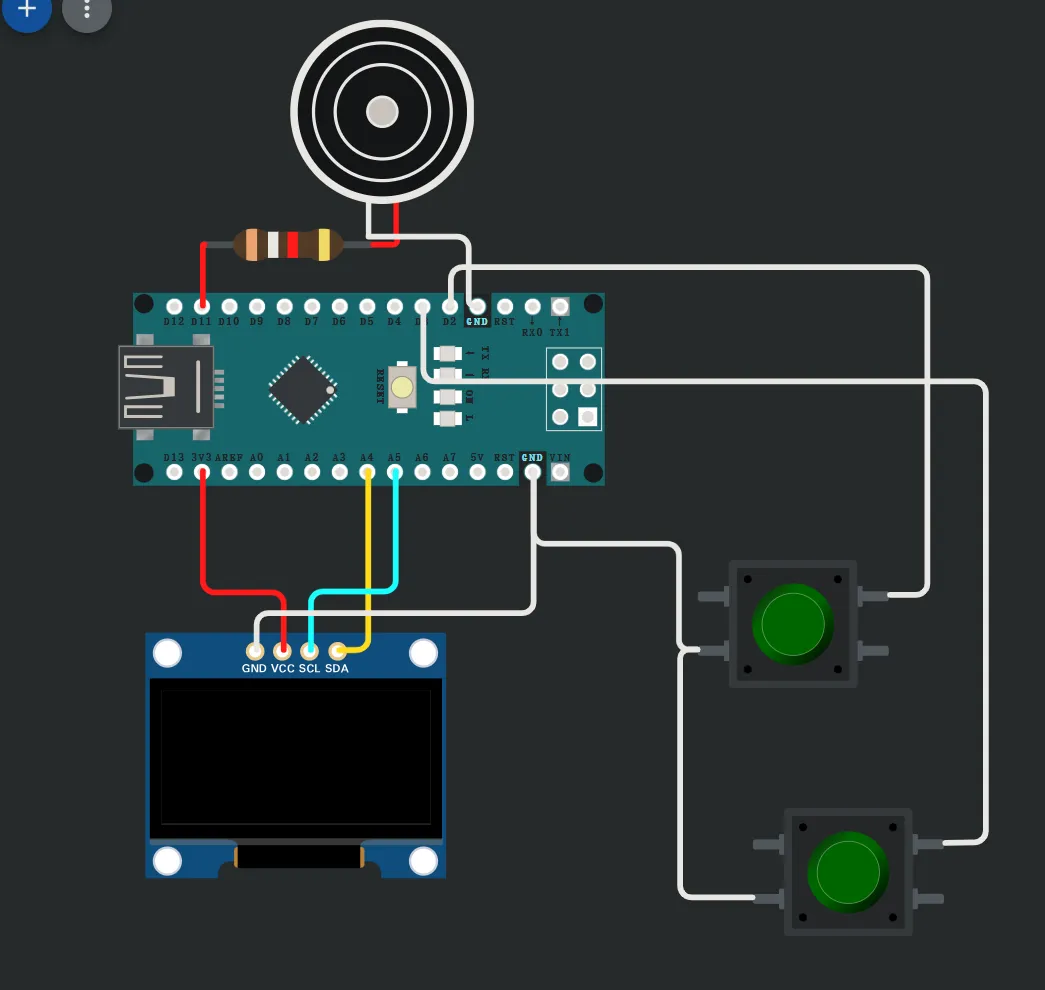
测试项目: pong
https://wokwi.com/projects/348849468083274322
已知问题:屏幕字库不支持中文
切换菜单的 代码
<SPI.h><Wire.h><Adafruit_GFX.h><Adafruit_SSD1306.h>
UP_BUTTON 2DOWN_BUTTON 3String MENU_LIST[4] = { "Color", "Speed", "Light", "Power off" };int CURRENT_MENU = 0;int MENU_ITEMS = 4;

Adafruit_SSD1306 display = Adafruit_SSD1306(128, 64, &Wire);
uint8_t count;

void setup(){  display.begin(SSD1306_SWITCHCAPVCC, 0x3C);
  // Display the splash screen (we're legally required to do so)  display.display();  // unsigned long start = millis();
  pinMode(UP_BUTTON, INPUT_PULLUP);  pinMode(DOWN_BUTTON, INPUT_PULLUP);
  display.clearDisplay();
  display.setTextSize(2);  display.setTextColor(WHITE);  display.setCursor(10, 18);  display.display();
}
void loop(){  static bool up_state = false;  static bool down_state = false;  up_state |= (digitalRead(UP_BUTTON) == LOW);  down_state |= (digitalRead(DOWN_BUTTON) == LOW);

  if (up_state)  {    delay(300);    CURRENT_MENU = (CURRENT_MENU+1)%MENU_ITEMS;  }  if (down_state)  {    delay(300);    if (CURRENT_MENU > 0) {      CURRENT_MENU -= 1;    } else {      CURRENT_MENU = 0;    }  }  up_state = down_state = false;  display.clearDisplay();  display.setCursor(5, 18);  display.print(CURRENT_MENU);  display.setCursor(25, 18);  display.print(MENU_LIST[CURRENT_MENU]);  display.display();}
// 调试问题:https://www.jianshu.com/p/8e14f233d0e7
文字显示 在线取模: https://www.zhetao.com/fontarray.html https://javl.github.io/image2cpp/ 默认配置即可
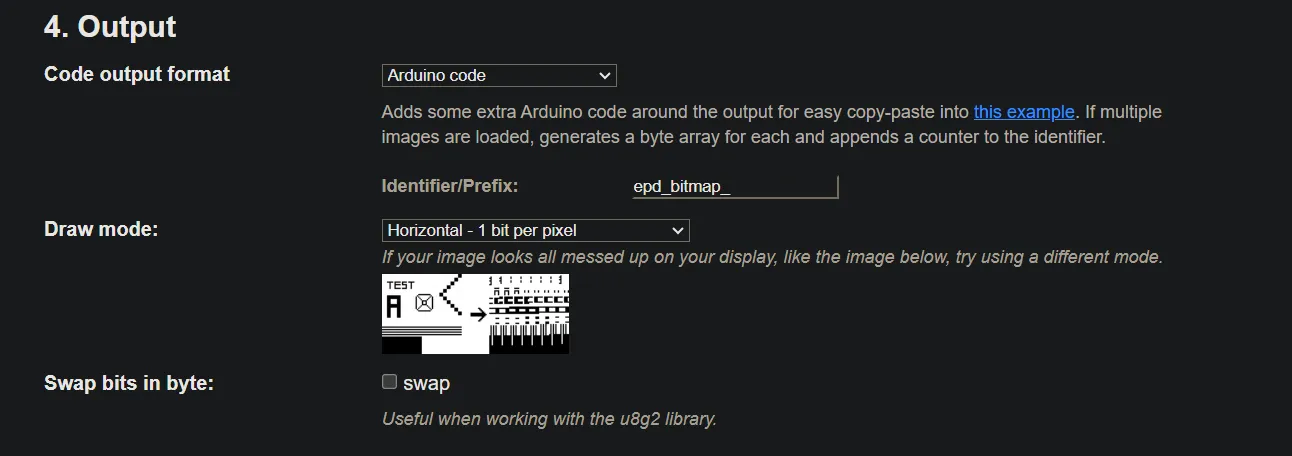
忍杀取模 64 * 32

// 'sp20240329_170854_974', 58x32pxconst unsigned char epd_bitmap_sp20240329_170854_974 [] PROGMEM = { 0x00, 0x00, 0x01, 0xc0, 0x10, 0x00, 0x00, 0x00, 0xc0, 0x00, 0x0f, 0x80, 0x1c, 0x00, 0x03, 0x00, 0x3c, 0x00, 0x7f, 0x80, 0x1e, 0x00, 0x0e, 0x00, 0x0f, 0xc3, 0xff, 0x80, 0x1f, 0x90, 0x7e, 0x00, 0x03, 0xff, 0xff, 0x80, 0x9f, 0x99, 0xf4, 0x00, 0x01, 0xff, 0xc7, 0x00, 0x7f, 0x1f, 0xcc, 0x80, 0x01, 0xfc, 0x0f, 0x00, 0x3e, 0x0f, 0x18, 0x80, 0x03, 0xf8, 0x0f, 0x00, 0x3f, 0x0e, 0x19, 0x80, 0x03, 0xf0, 0x0f, 0x00, 0x3f, 0xce, 0x31, 0x80, 0x07, 0xe0, 0x0f, 0x00, 0x73, 0x8f, 0x33, 0xc0, 0x1f, 0xc0, 0x07, 0x00, 0x61, 0x1f, 0x73, 0xc0, 0x7f, 0x80, 0x87, 0x80, 0x80, 0x3f, 0x63, 0x80, 0x3f, 0x80, 0x67, 0x80, 0x38, 0x7e, 0x67, 0x80, 0x0f, 0x80, 0x3f, 0xc0, 0xf0, 0x1c, 0xff, 0x00, 0x03, 0xc8, 0x1f, 0xc0, 0x70, 0x08, 0xfe, 0x00, 0x00, 0x64, 0x07, 0x80, 0x31, 0xc1, 0xfc, 0x00, 0x23, 0x16, 0x03, 0x00, 0x3f, 0x00, 0x00, 0x00, 0x11, 0xc6, 0x00, 0x00, 0x78, 0x3f, 0x80, 0x00, 0x19, 0xe7, 0x40, 0x81, 0xf0, 0x07, 0xfe, 0x00, 0x39, 0xcf, 0x41, 0x00, 0x78, 0x40, 0xfc, 0x00, 0x79, 0x9f, 0x63, 0x00, 0x7e, 0x30, 0x78, 0x00, 0x79, 0x9e, 0x66, 0x00, 0xff, 0x98, 0xf0, 0x00, 0x33, 0x8c, 0xf6, 0x00, 0xbb, 0x8f, 0xe0, 0x00, 0x03, 0x81, 0xf7, 0x01, 0x33, 0x07, 0xc0, 0x00, 0x03, 0xc1, 0xf7, 0x80, 0x31, 0x0f, 0xf8, 0x00, 0x01, 0xe1, 0xe7, 0x80, 0x39, 0x1f, 0xf0, 0x00, 0x00, 0x70, 0xc7, 0x00, 0x78, 0x79, 0xe0, 0x00, 0x00, 0x38, 0x0f, 0x00, 0xfc, 0xe1, 0xc0, 0x00, 0x00, 0x1c, 0x1e, 0x00, 0x7d, 0x81, 0x00, 0x00, 0x00, 0x06, 0x38, 0x00, 0x1c, 0x00, 0x00, 0x00, 0x00, 0x03, 0xe0, 0x00, 0x04, 0x00, 0x00, 0x00, 0x00, 0x00, 0x80, 0x00, 0x00, 0x00, 0x00, 0x00};
// Array of all bitmaps for convenience. (Total bytes used to store images in PROGMEM = 272)const int epd_bitmap_allArray_LEN = 1;const unsigned char* epd_bitmap_allArray[1] = { epd_bitmap_sp20240329_170854_974};
最简显示BMP代码
<SPI.h><Wire.h><Adafruit_GFX.h><Adafruit_SSD1306.h>
Adafruit_SSD1306 display = Adafruit_SSD1306(128, 32, &Wire);
// 'sp20240329_170854_974', 58x32pxconst unsigned char epd_bitmap_sp20240329_170854_974 [] PROGMEM = { 0x00, 0x00, 0x01, 0xc0, 0x10, 0x00, 0x00, 0x00, 0xc0, 0x00, 0x0f, 0x80, 0x1c, 0x00, 0x03, 0x00, 0x3c, 0x00, 0x7f, 0x80, 0x1e, 0x00, 0x0e, 0x00, 0x0f, 0xc3, 0xff, 0x80, 0x1f, 0x90, 0x7e, 0x00, 0x03, 0xff, 0xff, 0x80, 0x9f, 0x99, 0xf4, 0x00, 0x01, 0xff, 0xc7, 0x00, 0x7f, 0x1f, 0xcc, 0x80, 0x01, 0xfc, 0x0f, 0x00, 0x3e, 0x0f, 0x18, 0x80, 0x03, 0xf8, 0x0f, 0x00, 0x3f, 0x0e, 0x19, 0x80, 0x03, 0xf0, 0x0f, 0x00, 0x3f, 0xce, 0x31, 0x80, 0x07, 0xe0, 0x0f, 0x00, 0x73, 0x8f, 0x33, 0xc0, 0x1f, 0xc0, 0x07, 0x00, 0x61, 0x1f, 0x73, 0xc0, 0x7f, 0x80, 0x87, 0x80, 0x80, 0x3f, 0x63, 0x80, 0x3f, 0x80, 0x67, 0x80, 0x38, 0x7e, 0x67, 0x80, 0x0f, 0x80, 0x3f, 0xc0, 0xf0, 0x1c, 0xff, 0x00, 0x03, 0xc8, 0x1f, 0xc0, 0x70, 0x08, 0xfe, 0x00, 0x00, 0x64, 0x07, 0x80, 0x31, 0xc1, 0xfc, 0x00, 0x23, 0x16, 0x03, 0x00, 0x3f, 0x00, 0x00, 0x00, 0x11, 0xc6, 0x00, 0x00, 0x78, 0x3f, 0x80, 0x00, 0x19, 0xe7, 0x40, 0x81, 0xf0, 0x07, 0xfe, 0x00, 0x39, 0xcf, 0x41, 0x00, 0x78, 0x40, 0xfc, 0x00, 0x79, 0x9f, 0x63, 0x00, 0x7e, 0x30, 0x78, 0x00, 0x79, 0x9e, 0x66, 0x00, 0xff, 0x98, 0xf0, 0x00, 0x33, 0x8c, 0xf6, 0x00, 0xbb, 0x8f, 0xe0, 0x00, 0x03, 0x81, 0xf7, 0x01, 0x33, 0x07, 0xc0, 0x00, 0x03, 0xc1, 0xf7, 0x80, 0x31, 0x0f, 0xf8, 0x00, 0x01, 0xe1, 0xe7, 0x80, 0x39, 0x1f, 0xf0, 0x00, 0x00, 0x70, 0xc7, 0x00, 0x78, 0x79, 0xe0, 0x00, 0x00, 0x38, 0x0f, 0x00, 0xfc, 0xe1, 0xc0, 0x00, 0x00, 0x1c, 0x1e, 0x00, 0x7d, 0x81, 0x00, 0x00, 0x00, 0x06, 0x38, 0x00, 0x1c, 0x00, 0x00, 0x00, 0x00, 0x03, 0xe0, 0x00, 0x04, 0x00, 0x00, 0x00, 0x00, 0x00, 0x80, 0x00, 0x00, 0x00, 0x00, 0x00};
// 动画用帧数控制// Array of all bitmaps for convenience. (Total bytes used to store images in PROGMEM = 272)const int epd_bitmap_allArray_LEN = 1;const unsigned char* epd_bitmap_allArray[1] = { epd_bitmap_sp20240329_170854_974};
void setup(){  display.begin(SSD1306_SWITCHCAPVCC, 0x3C);  display.clearDisplay();
  display.drawBitmap(35, 0, epd_bitmap_sp20240329_170854_974, 58, 32, SSD1306_WHITE);
  display.display();}
void loop(){
}
最终控制代码
<Arduino.h><String.h><Adafruit_NeoPixel.h><Adafruit_GFX.h><Adafruit_SSD1306.h>

// 按钮参数UP_BTN 2       // D2 (可省略)DOWN_BTN 3     // D3CONFIRM_BTN 4  // D4// 灯带参数LED_PIN 6  //D6LED_NUM 30DelayTime 50
Adafruit_NeoPixel strip(LED_NUM, LED_PIN, NEO_GRB + NEO_KHZ800);


/*    屏幕链接:    SCK A5    SDA A4*/Adafruit_SSD1306 display = Adafruit_SSD1306(128, 32, &Wire);
// 先测试通过上下按键切换不同的菜单选项
// 菜单String menuList[] = {  "1:Mode",  "2:Bright",  "3:Color",  "4:Delay",};
// 当前菜单项uint8_t currentMenuIndex = 0;// 菜单总长度(用于处理uint8_t menuLength = 4;// 标记是否在子菜单中,负责渲染菜单/选项 和 处理按键操作bool isSubMenu = false;
// 模式相关String modeList[] = {  "Rainbow Flow",    // 0 彩虹跑马灯  "Rainbow Pause",   // 1 彩虹暂停  "Rainbow Breath",  // 2 彩虹呼吸灯  "Breath",          // 3 单色呼吸灯  "Blink",           // 4 闪烁  "Pulse",           // 5 脉动  "Sigle Color",     // 6 单色常亮(从头开始依次点亮)};uint8_t currentModeIndex = 0;uint8_t modeLength = 7;
// 亮度相关 默认中等亮度float brightList[] = { 15, 31, 127, 255 };uint8_t currentBrightIndex = 1;uint8_t brightLength = 4;
// 速度配置项 // 单位毫秒,更新一次的时间unsigned long delayList[] = { 20, 50, 100, 500 };uint8_t currentDelayIndex = 2;uint8_t delayLength = 4;// 色彩 // 可能不需要,考虑通过Hue 实现渐变uint32_t colorList[] = {  strip.Color(255, 0, 0),     // 红色  strip.Color(255, 165, 0),   // 橙色  strip.Color(255, 255, 0),   // 黄色  strip.Color(0, 128, 0),     // 绿色  strip.Color(0, 255, 255),   // 青色  strip.Color(0, 0, 255),     // 蓝色  strip.Color(128, 0, 128),   // 紫色  strip.Color(255, 255, 255)  // 白色};
String colorNameList[] = {  "Red",  "Orange",  "Yellow",  "Green",  "Cyan",  "Blue",  "Purple",  "White",};uint8_t currentColorIndex = 1;uint8_t colorLength = 8;
// 处理按钮截流和灯效延迟bool btn_flag = false;unsigned long previousMillisBtn = 0;unsigned long previousMillis = 0;// seed用于生成特效时记录当前的渲染指数long rainbowSeed = 0;int breathSeed = 0;int pulseSeed = 0;
// 灯效相关代码
// 控制呼吸灯强度void setBreathBrightness(int breathSteps) {  int step = floor(brightList[currentBrightIndex] / breathSteps);  /**     * 当前的 seed 提供初始值     * 共计循环 steps *2 次,每次单独计算亮度,     * 随后计算本次亮度(如何处理默认亮度?通过判断 currentModeIndex 跳过、     * seed小于steps: 直接设定亮度为 seed * step     * seed大于steps: 设定为 currentBright - (seed-steps)*step     * */  int bright = 0;  if (breathSeed <= breathSteps) {    bright = breathSeed * step;  } else {    bright = brightList[currentBrightIndex] - ((breathSeed - breathSteps) * step);  }  breathSeed = (breathSeed + 1) % (2 * breathSteps);
  strip.setBrightness(bright);}
// 彩虹跑马灯 参数控制是否静态void rainbowFlow(bool isStatic) {  // 向上取整  uint16_t step = ceil(65535 / strip.numPixels());  uint16_t firstHue = 65535 - rainbowSeed * step;  // 根据seed算出当前第一个led的Hue seed  // 直接算出修正值,用于修正  for (uint16_t i = 0; i < strip.numPixels(); i++)  // 遍历灯条  {    /**         * 计算颜色         * seed 需要跟 灯珠数量对比         * 第一个偏移为0, 每个灯珠的 Hue 步进为多少?(65535/30?)         * 指定第i灯的颜色         * 例如:长度10, 0灯初始Hue为0, 1灯初始Hue 为 6553         * 第二帧时: 0灯Hue 为 65535-6553 1灯为0         * 3帧: 0 = 65535-6553-6553(65535*(10-2)/10) 1 为 65535*(10-1)/10         */    uint16_t pixelHue = firstHue + step * i;    strip.setPixelColor(i, strip.gamma32(strip.ColorHSV(pixelHue)));  }  if (!isStatic) {    rainbowSeed = (rainbowSeed + 1) % strip.numPixels();  }  strip.show();}
void rainbowBreath(int steps) {  setBreathBrightness(steps);  rainbowFlow(false);}void singleColor(int len = strip.numPixels()) {  // 单色,直接点亮  if (len > 0) {    strip.fill(colorList[currentColorIndex], 0, len);  } else {    strip.clear();  }  strip.show();}
// 此处 steps 不能小于最小亮度void singleBreath(int breathSteps)// 通过 breathSeed 来控制当前的呼吸灯状态。 breathSteps 控制段数{  setBreathBrightness(breathSteps);  singleColor();}
/** * 处理灯光闪烁 */void blink() {  // 跟呼吸同理,但是只有亮灭,step 为1 即可实现  singleBreath(1);}void pulse() {  /**     * 通过 pulseSeed 实现。上限为 length*2     * 根据 pulse获得当前长度,然后用 fill 填充长度即可     */  int total = strip.numPixels();  strip.clear();  if (pulseSeed <= total) {    singleColor(pulseSeed);  } else {    singleColor(total - (pulseSeed - total));  }
  pulseSeed = (pulseSeed + 1) % (total * 2);}
// 功能性方法,处理屏幕和按键
/**处理按钮按下的后续操作 * 总共三个按钮需要处理 * 按键类型用对应针脚代替 * 上    D2  2 * 下    D3  3 * 确认  D4  4 * (也可以简化掉 上键 * * 判断处理顺序: * 先判断是否为 confirm、 * 判断当前是否 sub */void handlePressBtn(uint8_t type) {  if (type == CONFIRM_BTN) {    isSubMenu = !isSubMenu;  } else if (!isSubMenu)  // 主菜单  {    switch (type) {      case DOWN_BTN:  // 下        currentMenuIndex = (currentMenuIndex + 1) % menuLength;        break;      case UP_BTN:  // 上        currentMenuIndex = (currentMenuIndex == 0 ? menuLength : currentMenuIndex) - 1;        break;    }  } else  // 子菜单  {    switch (type) {      case DOWN_BTN:  // 下        switch (currentMenuIndex) {          case 0:  // MODE            currentModeIndex = (currentModeIndex + 1) % modeLength;            break;          case 1:  // Bright            currentBrightIndex = (currentBrightIndex + 1) % brightLength;            break;          case 2:  // Color            currentColorIndex = (currentColorIndex + 1) % colorLength;            break;          case 3:  // Delay            currentDelayIndex = (currentDelayIndex + 1) % delayLength;            break;        }        break;      case UP_BTN:  // 上
        switch (currentMenuIndex) {          case 0:  // MODE            currentModeIndex = (currentModeIndex == 0 ? modeLength : currentModeIndex) - 1;            break;          case 1:  // Bright            currentBrightIndex = (currentBrightIndex == 0 ? brightLength : currentBrightIndex) - 1;            break;          case 2:  // Color            currentColorIndex = (currentColorIndex == 0 ? colorLength : currentColorIndex) - 1;            break;          case 3:  // Delay            currentDelayIndex = (currentDelayIndex == 0 ? delayLength : currentDelayIndex) - 1;            break;        }        break;    }  }}
/** * 该方法用于渲染当前屏幕内容 */void renderScreen() {  display.clearDisplay();  // 根据当前是否为子菜单判断  if (!isSubMenu) {    // 字号2    display.setCursor(0, 6);    display.setTextSize(2);    // 渲染主菜单内容    display.print(menuList[currentMenuIndex]);  } else {    // 字号1    display.setTextSize(1);    // 先渲染Menu项:    display.setCursor(0, 0);    display.print(menuList[currentMenuIndex] + ":");    // 再获取 subMenu 选项    String text;    // 当前为子菜单时,根据case 渲染对应的 item    switch (currentMenuIndex) {      case 0:  // MODE        text = modeList[currentModeIndex];        break;      case 1:  // Bright        text = String(currentBrightIndex + 1);        break;      case 2:  // Color        text = colorNameList[currentColorIndex];        break;      case 3:  // Delay        text = "Delay: " + String(delayList[currentDelayIndex]) + " ms";        break;    }    display.setCursor(12, 12);    display.print(text);  }  display.display();}
/** * 用于点亮灯条,根据当前的参数选择不同的灯条渲染方法  String modeList[] = {    "Rainbow Flow",     // 彩虹跑马灯    "Rainbow Gradient", // 彩虹暂停    "Rainbow Breath",   // 彩虹呼吸灯    "Breath",           // 单色呼吸灯    "Blink",            // 闪烁    "Pulse",            // 脉动    "Sigle Color",      // 单色常亮(从头开始依次点亮)  }; * *灯效处理内部不加延时 */void renderStrip() {  // 设置亮度  // 如果 mode 不为呼吸灯,呼吸灯则跳过设置亮度  if (currentModeIndex != 2 && currentModeIndex != 3) {    strip.setBrightness(brightList[currentBrightIndex]);  }
  switch (currentModeIndex) {    case 0:  // 彩虹跑马灯      rainbowFlow(false);      break;    case 1:  // 彩虹暂停      // rainbowStatic();      rainbowFlow(true);      break;    case 2:  // 彩虹呼吸灯      rainbowBreath(15);      break;    case 3:  // 单色呼吸灯      singleBreath(15);      break;    case 4:  // 闪烁      // 呼吸 step 为 1 即可实现      singleBreath(1);      break;    case 5:  // 脉动      pulse();      break;    case 6:  // 单色常亮      singleColor();      break;    default:      rainbowFlow(false);  }
  // 测试用}
// 最后执行阶段void setup() {  // 初始化灯条  strip.begin();  strip.setBrightness(brightList[currentBrightIndex]);  strip.show();
  // 初始化按键
  pinMode(UP_BTN, INPUT_PULLUP);  pinMode(DOWN_BTN, INPUT_PULLUP);  pinMode(CONFIRM_BTN, INPUT_PULLUP);
  // 初始化屏幕  display.begin(SSD1306_SWITCHCAPVCC, 0x3C);  display.clearDisplay();  display.setTextSize(2);  display.setTextColor(WHITE);}
void loop() {  /**     * 此处结构为:     * 初始化     * 监听按键     *  按下则按照情况处理     * 渲染界面     *  根据当前的 isSubmenu 和 currentMenu 以及 index 等处理显示内容     * 点亮灯条     *  根据当前的所有参数(Bright, Mode, Delay, Random) 进行渲染     */
  unsigned long currentMillis = millis();  // 获取当前时间
  // 监听按键  static bool up_state = false;  static bool down_state = false;  static bool confirm_state = false;  // 读取按键  up_state |= (digitalRead(UP_BTN) == LOW);  down_state |= (digitalRead(DOWN_BTN) == LOW);  confirm_state |= (digitalRead(CONFIRM_BTN) == LOW);
  if (currentMillis - previousMillisBtn >= 300) {    // 按钮flag 复位    btn_flag = false;  }
  if (!btn_flag && (up_state || down_state || confirm_state)) {    delay(20);    // 储存当前按钮时间戳并且设定 flag, 跳过200ms内的处理    previousMillisBtn = currentMillis;    btn_flag = true;    if (up_state) {      handlePressBtn(UP_BTN);    } else if (down_state) {      handlePressBtn(DOWN_BTN);    } else if (confirm_state) {      handlePressBtn(CONFIRM_BTN);    }  }  up_state = down_state = confirm_state = false;  // 比较按钮时间戳并且在200ms后复位 btn_flag
  // 展示屏幕内容  renderScreen();  // 根据指定的延迟渲染灯条  if (currentMillis - previousMillis >= delayList[currentDelayIndex]) {    renderStrip();    previousMillis = currentMillis;  }}